I tested 40 nail printer designs: which print clean
- High-contrast, bold-shape, single-focal designs print clean; busy or low-contrast images blur at nail scale.
- You don't need to be an artist — pick from 5,000+ designs or upload your own photo.
- Seven rules below tell you which design will look sharp before you ever hit print.
I sat down with a V11 and ran 40 designs through it — half from the built-in catalog, half custom images I uploaded myself, including a pet photo, a monogram, and a few floral graphics for wedding and graduation season. Some came out crisp enough to stop you mid-scroll. A few turned to mush. The difference had almost nothing to do with the machine and almost everything to do with the image I fed it. So here's the pattern I found, written so you can predict the result before you waste a single coat.
Why some designs print clean and others don't
A nail is roughly a centimeter of slightly curved surface. That's the whole canvas. A nail printer reproduces your image faithfully — which means it reproduces a great image faithfully and a cluttered one faithfully too. The screen flatters everything; the nail tells the truth. Once you understand what survives that shrink-down, picking winning designs gets easy. These seven rules cover most of what I saw across those 40 prints.
Rule 1 — Contrast beats detail
The single biggest predictor of a clean print was contrast. A design with strong light-versus-dark separation reads instantly on a nail. Subtle, low-contrast gradients — think a pale beige fading into a slightly paler beige — look gorgeous on a monitor and nearly disappear once printed at thumbnail size. If you're unsure about a design, squint at it. If it still reads when blurred, it'll print well.
Rule 2 — Bold shapes survive; hairline detail doesn't
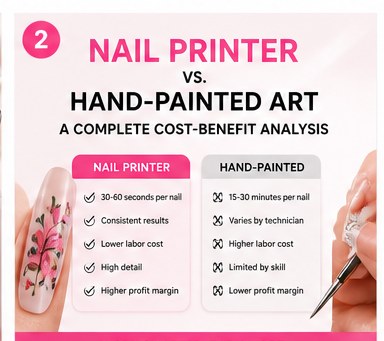
Thick graphic elements — a solid daisy, a heart, a chunky checkerboard — hold their edges across the nail's curve. Hair-thin linework, tiny serif lettering, and intricate lace patterns are where prints get muddy, because there isn't enough room for the fine strokes to stay separate. Want lettering? Go bold and short. A two-letter monogram in a heavy font beats a delicate cursive phrase every time.
Rule 3 — One focal point per nail
The catalog designs that photographed best had a single clear subject: one flower, one shape, one symbol. The custom uploads that flopped were collages — three things competing for a centimeter of space. Pick the hero element and let it own the nail. If you love a busy design, split it across five nails instead of cramming it onto one.
Rule 4 — For faces and pets, crop in close
This is the rule that surprised me most. A full-body photo of a dog prints as an unreadable speck. A tight crop of just the dog's face — eyes, nose, a bit of fur — prints as something people actually recognize. Same with a person or a logo: close, simple, and centered wins. Cut the background out before you upload; an empty or solid backdrop lets the subject breathe.
Rule 5 — Saturated color pops, muddy color flattens
Punchy, saturated palettes — a bright coral, a deep navy, a clean white — came out vivid. Desaturated, "moody" photos with lots of grey midtones looked flat and lifeless on the nail. If you're uploading your own image, bump the saturation a notch first. The print rewards confident color.
Rule 6 — Match the design to the base
The print sits on your prepped nail, so the base color underneath matters. A dark design on a dark base loses its edges; the same design on a light base snaps into focus. As a default, light base for dark or colorful designs, and a clean white or nude base when you want the printed art to be the whole story. The print itself comes off dry — you finish with your normal topcoat process, the same one you already use for gel, dip, or BIAB.
Rule 7 — Leave a little negative space
The most polished-looking prints didn't fill the nail wall to wall. A thin bare border, or a design that sits in the center with clean space around it, looks intentional and expensive. Edge-to-edge designs looked busier and showed placement imperfections more. A little breathing room is the cheapest upgrade in the whole process.
You don't have to design anything yourself
Here's the part that takes the pressure off: you don't need to be an illustrator. The V11 ships with a catalog of 5,000+ designs, and the app handles sizing and placement for you. If you want to go custom, you upload an image — a photo, a monogram, a graphic — and the seven rules above are really just "pick or shoot a good image." That's the whole skill. For owners who want a head start, our Print Studio Membership ($49) is a curated design library plus training built around exactly this kind of selection.
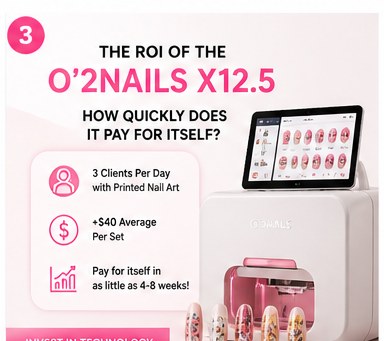
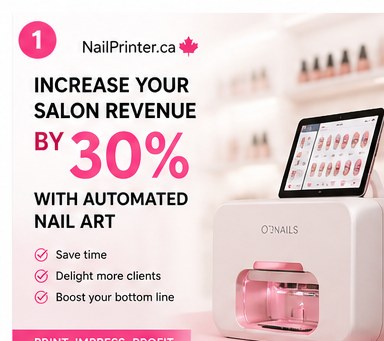
The V11 is the machine I tested here — it's the mobile, app-controlled printer built for home techs, creators, and small salons, and it lists at $2,999. It prints a full design in seconds, versus the 30–45 minutes the same look takes by hand. If you're weighing the V11 against the salon-flagship X12.5 and aren't sure which fits, our buying guide walks through who each one is for.
How to use these rules for the season you're in
Wedding season is open through September, and graduation is right now. The rules map cleanly: a bridal monogram in a heavy serif (Rule 2, bold lettering) on a soft nude base (Rule 6) with a thin bare border (Rule 7) is a clean, repeatable bridal-party look. School-color graduation nails work because they're high-contrast and simple (Rules 1 and 3). Summer florals print beautifully when they're a single saturated bloom per nail rather than a whole bouquet. Same machine, same seven rules, different calendar.
FAQ
Can a nail printer print a custom photo?
Yes. You can upload your own image — a pet, a monogram, a logo, a photo — and the printer reproduces it on the nail. You'll get the best result from a high-contrast image with a single clear subject and the background removed.
Do you need to be an artist to use a nail printer?
No. You either pick from the 5,000+ designs in the catalog or upload an image, and the app handles sizing and placement. The only "skill" is choosing or shooting a good image, which the seven rules above cover.
What kinds of designs print best?
High-contrast, bold-shape, single-focal-point designs. Busy collages, hair-thin linework, and low-contrast or desaturated images lose detail at the small scale of a nail.
How many designs come with the printer?
The catalog includes 5,000+ designs, and you can add your own images on top of that.
Does a printed design need a drying lamp?
The print itself comes off dry. You finish with your normal topcoat process — the same step you already use for gel, dip, or BIAB.
Next step
If you want to put these rules to work, the V11 is the printer I tested them on.
See the V11 — the creator's nail printer →
— Maya, NailPrinter.ca · the only North American O'2Nails distributor · hello@nailprinter.ca